PalomaTalk
The basics of Internet and all things digital -
designed to help you learn
How to create a Zoom account
Creating a Zoom account involves the 2 stages explained below:
-
Sign up in the Zoom app using your email address
-
Activate your account
It is optional if you want to join the meeting that someone else organised, but you will need an account to host a meeting.
1. Sign up in the Zoom app using your email address
-
STEP 1: Open the Zoom app and click on "Sign Up" at the bottom left (circled in blue in the example picture).
-
STEP 2: Next for verification you need to enter your date of birth. Tap on the writing that says "Month/Day/Year" in the middle of the screen and enter your date of birth adjusting the numbers by pressing the plus and minus signs of the spinning wheels. Confirm by pressing "Set". Note that this information will not be stored.
-
STEP 3: Next, you will be asked to fill in your email address, first name and last name. Then tap on the blue "Sign up" button.
-
STEP 4: The next page will tell you that you have been sent an activation link via email to the email address you have used. The next step is going to your email account to look for the message and activate your account.


2. Activate your account
-
STEP 1: Log into your email account. You will have a Welcome email in your inbox from Zoom. It is asking you to click on the orange button to activate the account. Tap on the orange button to do so; this will open the next page with your web browser. On the next page confirm whether you are signing up on the behalf of a school - tap either yes or no and then the grey "Continue" button.
-
STEP 2: Next you will need to enter your first and last name in the corresponding boxes (we chose Paloma as first, and Talk as last name). Create a password and enter it in the box below and repeat it in the next box to confirm it. Tick whether you are signing up on the behalf of a school - click either yes or no and then click on the orange "Continue" button. If there is a pop-up window from your phone asking you whether to save your login, choose according to your preference (since this is only to activate the account in the web browser and not the app, you may choose "Never save").
-
NOTE: If you put your full name in at this stage, during a meeting you can change what name you appear under - for example, you can use your first name or even a nickname if you would like to stay anonymous (explained in "Join a meeting").
-
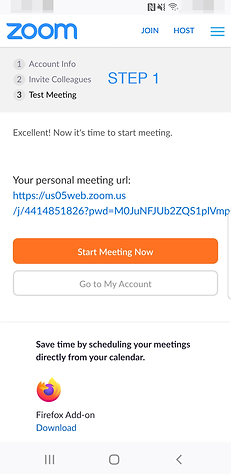
STEP 3: On the next screen, you can invite your friends to install Zoom (this is optional). Click "Skip this step" if you do not want to do this at this stage.
-
NOTE: if you start a meeting, your friends do not need to have an account to participate.
-
Your account is now activated. Continue by having a test meeting or directly using the platform.